Custom Blinds Online Installation Checklist for a Flawless Fit
Did you know that over 60 percent of DIY blind installations fail because of inaccurate measuring or improper preparation? Installing blinds that fit perfectly can change the entire feel of your room and add lasting value to your home. By learning the simple steps for precise measurement and setup, you can save money, avoid costly mistakes, and enjoy beautifully finished windows with a professional look.
Quick Summary
| Key Point | Explanation |
| 1. Accurate measurements are essential | Measure window width and height three times for precision and avoid errors in installation. |
| 2. Correct tool selection matters | Gather necessary tools and choose blinds suited to your window materials and climate for effective installation. |
| 3. Thorough workspace preparation is key | Clean windows and organize tools to create a stable environment for seamless installation. |
| 4. Securely install brackets and hardware | Properly mark and install brackets, ensuring they are level, for a strong and professional finish. |
| 5. Test blinds for proper function | Operate blinds multiple times to confirm smooth motion and correct alignment before considering the job finished. |
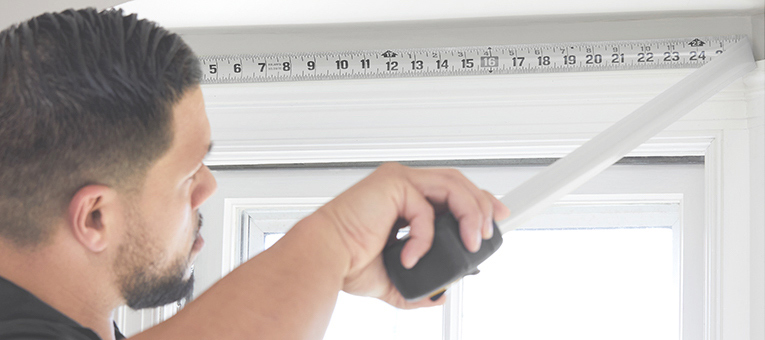
Step 1: Assess and Measure Window Spaces
Preparing for a perfect blinds installation starts with accurate window measurements. Getting this right ensures your new window coverings will fit seamlessly and look professional. You want precision that transforms your living spaces without the hassle of returns or adjustments.
Start by gathering the right tools for measurement your measuring tape, notepad and pencil. For each window frame you will want to take three separate measurements horizontally width and three vertically height. Measure at the top middle and bottom of the window frame to account for any slight variations in building construction. Pro tip always measure in millimetres for the most accurate results.
When measuring remember to decide whether you want an inside mount inside the window frame or an outside mount that covers the entire window area. Inside mounts require precise measurements to the millimetre while outside mounts offer more flexibility with a few extra centimetres of clearance. Write down each measurement carefully double checking your numbers. Accuracy here prevents expensive mistakes down the line.
If your windows have unusual shapes irregular frames or architectural quirks do not stress. Professional installers can help you navigate complex measurement scenarios. One helpful strategy is to sketch a quick diagram of each window noting its specific characteristics and measurements. This provides a visual reference that makes the entire process smoother and more reliable.
Step 2: Select Suitable Blinds and Tools
Selecting the right blinds and tools is crucial for a successful installation that transforms your living spaces. You will want to match your window measurements with the perfect blind style that complements your home aesthetics and functional needs. In the types of blinds for South African homes, you will find various options tailored to different environments.
Let us talk tools and preparation. You will need a few essential items measuring tape pencil level drill with multiple drill bits screwdriver power drill optional wood filler safety glasses and perhaps a helping hand. Consider the material of your window frames whether wood aluminium or PVC as this impacts your tool selection. When choosing blinds look for materials that suit the Southern African climate resilient fabrics that resist sun damage and moisture.
Pro tip always purchase slightly more materials than you think you will need. This provides a buffer for potential measurement errors or unexpected challenges during installation. Some homeowners prefer roller blinds for simplicity while others opt for venetian or vertical blinds depending on their specific light control and privacy requirements. The key is matching your blind selection not just to your windows but to your lifestyle.
Your next step involves gathering your selected tools and preparing your workspace. Clear the area around your windows remove any existing window coverings and ensure you have a clean stable surface to work from. Take a moment to review your measurements one more time and confirm your blind selections. A bit of careful preparation now prevents frustrating problems later.
Step 3: Prepare Windows and Work Area
Preparing your windows and workspace is a critical step that sets the foundation for a smooth blinds installation. You want to create an environment that allows for precise work and minimises potential complications. With careful preparation you can transform your window area into a professional installation zone.
Begin by thoroughly cleaning your window frames and surrounding areas. Remove any dust dirt or old mounting hardware using a soft cloth and gentle cleaning solution. Check the structural integrity of your window frames ensuring they are solid and free from damage. In our guide to choosing indoor blinds, we emphasise the importance of a clean stable surface for optimal mounting.
Protect your workspace by laying down a drop cloth or old newspapers to catch any debris or potential paint chips. Gather all your tools within easy reach arranging them in the order you will use them. If you are working with wooden frames consider using wood filler to patch any small holes or imperfections before installation. Wear safety glasses and ensure good lighting to help you work accurately and safely.

Once your area is prepared take a moment to double check your measurements and confirm your blind specifications. Clear the surrounding furniture and create enough space to move comfortably during installation. Your careful preparation now will make the actual installation process smoother and more enjoyable. Remember professional results come from patient and thorough groundwork.
Step 4: Install Brackets and Mounting Hardware
Installing brackets and mounting hardware is a precise process that demands patience and attention to detail. This critical step ensures your blinds will be secure stable and perfectly positioned. Getting this right means the difference between professional looking window treatments and a DIY disaster.
Mark your bracket positions carefully using a level to guarantee straight horizontal placement. When drilling pilot holes consider the material of your window frame wood requires different techniques compared to aluminium or PVC. In choosing blind colours, experts recommend matching your bracket colour to your window frame or blind colour for a seamless appearance. We offer white, black and grey. Pro tip use wall anchors if you are not drilling directly into a stud especially for heavier window treatments.
Ensure each bracket is securely fastened using appropriate screws for your frame material. Check that brackets are level and equidistant from each other and the window frame edges. Test the stability of each bracket by applying gentle pressure before hanging your blinds. Small adjustments now can prevent larger problems later.
With your brackets firmly in place you are now ready for the exciting part mounting your actual blinds. Take a moment to celebrate your precise work knowing that your careful preparation will result in beautifully installed window coverings that enhance your living space. Your attention to detail during this stage sets the foundation for a professional looking finish.
Step 5: Attach and Align Blinds Correctly
Attaching and aligning your blinds requires precision patience and a steady hand. This final installation step transforms all your careful preparation into a beautiful functional window treatment. Getting the alignment just right means the difference between amateur and professional results.
Begin by carefully placing your blinds into the mounted brackets checking that they sit evenly and smoothly. For duo roller blinds, ensure the fabric rolls consistently without bunching or twisting. Test the mechanism by raising and lowering the blinds several times checking for smooth operation and symmetrical movement. Pro tip use a spirit level to confirm your blinds hang perfectly straight even if your window frame might have slight imperfections.
Pay close attention to the details during this stage. Check that your blinds are fully seated in the brackets with no wobbling or loose connections. Gently tighten any screws or adjustment mechanisms to secure the blind in place. If you notice any slight misalignment make small incremental adjustments until everything looks crisp and professional.
With your blinds now securely installed take a step back and admire your handiwork. You have successfully transformed your window space with a precise and professional installation. The careful steps you have followed will ensure your blinds not only look great but function smoothly for years to come.
Congratulations on completing your blinds installation project.
Step 6: Inspect and Test Installed Blinds
Inspecting and testing your newly installed blinds is the final crucial step that ensures your hard work pays off with a perfect window treatment. This stage transforms your installation from a technical process to a functional and aesthetic improvement for your living space.
Carefully operate your blinds through multiple full cycles of raising and lowering paying special attention to smooth movement and consistent fabric alignment. For double roller zebra blinds, test both layers independently checking that each rolls and stops precisely without snagging or uneven deployment. Check for any unusual sounds grinding or resistance which might indicate minor misalignments that need adjustment.
Look closely at the overall appearance examining how the blinds hang when fully extended and when partially closed. Check that your brackets remain secure and the blinds maintain a straight horizontal line. Test the control mechanisms whether cord or manual to ensure they operate with minimal effort. Pro tip natural light can help reveal subtle alignment issues so choose a bright time of day for your final inspection.
Your thorough testing now will prevent potential frustrations later. If you notice any minor issues address them immediately while your installation tools are still nearby. With careful inspection you have completed a professional grade blinds installation that will enhance your windows functionality and aesthetic appeal for years to come.
Ensure a Flawless Fit with Expert Guidance and Custom Solutions
Taking the time to measure precisely and prepare your windows might feel overwhelming. You want your blinds to fit perfectly, function smoothly, and look stunning without the stress of misalignment or tricky installation steps. This involves careful measurement, choosing the right style, and installing brackets and blinds with exact precision. The challenge is real but so is the satisfaction of professional results that transform your space.
At Custom Blinds South Africa, we understand the importance of each step in the blinds installation process. From accurate measurements and selecting durable, weather-resistant materials to expert fitting advice and a seamless experience, we are here to guide you. Explore our bespoke range of blinds designed specifically for South African homes and climates with options tailored for inside or outside mounts. Ready to avoid common pitfalls and enjoy a flawless finish right first time? Visit Custom Blinds South Africa today to request a consultation or view our gallery for inspiration. Your perfect window treatment solution is just a few clicks away.
Frequently Asked Questions
How do I measure my windows accurately for blinds installation?
To measure your windows accurately, use a measuring tape to take three horizontal measurements (top, middle, bottom) and three vertical measurements (left, middle, right) in millimeters. Write down each measurement carefully and double-check them to avoid mistakes during installation.
What tools do I need for a successful blinds installation?
You will need essential tools such as a measuring tape, a level, a drill with multiple bits, and a screwdriver. Gather all these items in advance to streamline the installation process and avoid interruptions.
What should I do if my windows have an unusual shape?
If your windows have an unusual shape or irregular frames, consider sketching a quick diagram noting the specific measurements and characteristics. This visual reference can help you or a professional installer make precise adjustments during installation.
How do I ensure my brackets are level during installation?
To ensure your brackets are level, use a level tool to mark the positions for each bracket carefully. This will help prevent misalignments, resulting in a more professional-looking finish for your blinds.
How can I test my installed blinds for functionality?
Test your installed blinds by raising and lowering them multiple times to check for smooth operation and alignment. Pay attention to any unusual sounds or resistance and make small adjustments if necessary to achieve a perfect fit.
What should I do if I notice misalignment after installation?
If you notice misalignment after installation, address it immediately by making small adjustments to the brackets or the blinds. Ensure everything is sitting securely and straight, which can save you from further frustrations down the line.