The Complete Guide to Outdoor Blinds, Awnings and Shutters in South Africa
You built the patio. You bought the furniture. Now the weather decides when you use it. Wind pushes rain across your cushions. Afternoon sun turns the space into an oven. Winter makes it a cold, dead zone from May to September. The right outdoor covering changes all of that. This guide covers every option available in South Africa, what works where, what lasts on the coast, and how to choose the right product for the way you actually live.
What are the best outdoor blinds, awnings and shutters for South African homes?
- Outdoor roller blinds in PVC, canvas or mesh fabric protect patios from wind, rain and UV exposure whilst maintaining views.
- Awnings extend overhead shade with retractable, louvre or folding-arm designs suited to different spaces and budgets.
- Aluminium security shutters provide weather protection, privacy and physical security for exposed openings.
- Coastal installations require marine-grade materials, PVC, powder-coated aluminium and stainless steel fittings resist salt corrosion.
- Motorised options from Somfy allow remote or automated control, including wind sensors that retract awnings in gusts above 35 km/h.
- Custom Blinds manufactures canvas awnings and outdoor blinds at their Garden Route facility and installs across George, Knysna and Plettenberg Bay.
- Combining products, such as outdoor blinds on the sides with a louvre awning overhead, creates full enclosure without permanent building work.
Need expert advice? Call Duncan on 079 523 5407 or WhatsApp a photo of your space.
TLDR
Outdoor blinds block wind and rain from the sides. Awnings provide shade overhead. Shutters add security and weather protection to windows and openings. For coastal South African homes, PVC blinds and powder-coated aluminium frames are the minimum standard. This guide compares every type, covers what lasts at the coast, and helps you choose based on your space, your climate and your budget.
What Changes
You stop checking the weather forecast before planning a braai. You stop dragging furniture inside every time the wind picks up. You stop writing off your patio for five months of the year. That is what the right outdoor covering does.
Rain Falls, You Stay
PVC blinds seal the sides. A louvre awning handles overhead drainage. You hear the rain but you do not feel it.
Wind Drops to a Breeze
Clear PVC blocks gusts whilst keeping the view. Mesh reduces wind speed without trapping heat. Both keep candles lit and napkins on the table.
Sun Without the Burn
Retractable awnings give you shade when you want it and open sky when you do not. No permanent structure needed.
Year-Round Living
Your patio becomes usable twelve months of the year. Not just summer. Not just calm days. Every day.
“People spend a fortune on the patio and the furniture, then leave it exposed to everything the weather throws at it. A proper set of outdoor blinds costs less than replacing those cushions twice.”
Duncan, Custom Blinds — 20 years experience across the Garden Route
Why Custom Blinds
Why choose a manufacturer that builds, installs and guarantees locally?
Custom Blinds is the only South African company that sells online, consults on-site, manufactures in-house and installs with their own team. No subcontractors. No middlemen. One point of contact from first measurement to final sign-off.
Years on the Garden Route
Operating from Knysna since 2010, serving George, Plettenberg Bay, Sedgefield, Wilderness and beyond.
Installations Completed
Homes, restaurants, guest houses and commercial properties. See real projects on our outdoor blinds case studies page.
Team, Start to Finish
Duncan measures. The factory builds. Duncan installs. If anything needs adjusting, you deal with the same person who measured your space.
What are outdoor blinds and how do they work?
Outdoor blinds mount to the fascia, beam or lintel above a patio opening and roll down to enclose the space from the sides. They handle wind, rain, sun and insects depending on the material you choose. Most South African patios need blinds on two or three sides, with the fourth wall being the house itself.
The key decision is material. Each fabric type serves a different purpose, and choosing wrong means either replacing them early or living with something that does not do the job properly.
Clear PVC Blinds

Clear PVC is the most popular choice for outdoor blinds in South African homes. It blocks wind and rain completely whilst keeping the view open. The material is jointless, a single sheet of PVC with no seams where water can penetrate. On the Garden Route, where the Knysna Heads funnel south-easterly wind straight into waterfront homes, clear PVC is the standard.
The trade-off is heat. Clear PVC lets sunlight through, which means covered patios can warm up on hot days. For north-facing patios in summer, consider tinted PVC or combine with an overhead awning for shade. PVC also clouds slightly over years of UV exposure, though quality materials resist this for far longer than budget alternatives.
Canvas Blinds
Canvas outdoor blinds block sun and provide privacy whilst letting air circulate through the weave. They suit spaces where heat build-up is a concern or where full transparency is not needed. Canvas treated for outdoor use resists mould and fading better than untreated fabric. Custom Blinds manufactures canvas blinds at their Garden Route facility, which means lead times are shorter and adjustments can be made locally.
Mesh and Sheerweave Blinds
Sheerweave and mesh blinds reduce wind speed and block UV without fully enclosing the space. They maintain airflow, which makes them suited to braai areas where smoke needs to escape and to spaces where full enclosure feels claustrophobic. Different openness factors, typically 1%, 3%, 5% or 10%, control how much air, light and visibility pass through. A 3% openness factor blocks approximately 97% of UV whilst still allowing a view of the garden.
Zip-Track and Channel-Guided Blinds
Standard outdoor blinds hang from a roller and can shift in the wind. Zip-track systems like Rialto guide the blind through sealed aluminium channels on each side, locking the fabric in place. This eliminates flapping in wind, creates a tighter seal against rain, and allows the mechanism to sit concealed within the fascia for a cleaner look. Zip-track blinds are the premium option and work particularly well in areas with consistent wind exposure.
How do outdoor blind types compare?
This table compares the main outdoor blind materials available in South Africa. Your choice depends on what you need most, weather protection, views, airflow or privacy.
| Feature | Clear PVC | Canvas | Mesh / Sheerweave | Zip-Track |
|---|---|---|---|---|
| Wind protection | Excellent | Good | Moderate | Excellent |
| Rain protection | Complete | Good (treated) | Limited | Complete |
| View through | Full | None | Partial (filtered) | Depends on fabric |
| UV blocking | Low (clear) | High | High (97%+) | Depends on fabric |
| Airflow | None when closed | Some (breathable) | Good | Minimal when closed |
| Coastal durability | Excellent | Good (if treated) | Excellent | Excellent |
| Privacy | Low (transparent) | Complete | Partial (daytime) | Depends on fabric |
| Best for | Views + full weather seal | Shade + privacy | Braai areas + airflow | Wind-exposed sites |
| Price range | Mid | Entry to mid | Mid | Premium |
How do awnings provide overhead shade without permanent building work?
Where outdoor blinds protect from the sides, awnings protect from above. They provide shade over patios, decks, windows and entrance ways. The key advantage over a permanent roof is flexibility, retractable awnings open fully for sun and stars, then close for rain and heat.
Retractable Folding-Arm Awnings
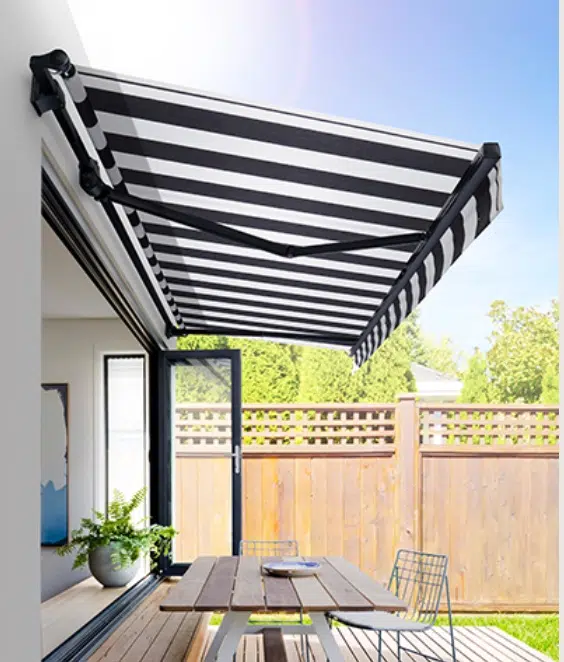
Folding-arm awnings extend outward from a wall-mounted cassette, projecting shade over the area below. When retracted, they fold neatly into a protective housing. Available in manual crank or motorised versions, they suit patios, balconies and outdoor dining areas. Arms extend up to 3.5 metres from the wall depending on the model, covering a substantial area without posts or legs. Read our retractable awnings guide for detailed comparisons.
Canvas is the standard material for retractable awnings. Solution-dyed canvas resists UV fading for years and sheds water when properly tensioned. On the Garden Route, south-easterly wind is the primary concern, Somfy wind sensors detect gusts and automatically retract the awning before damage occurs. This matters particularly in Plettenberg Bay and along the Knysna waterfront where conditions change quickly.
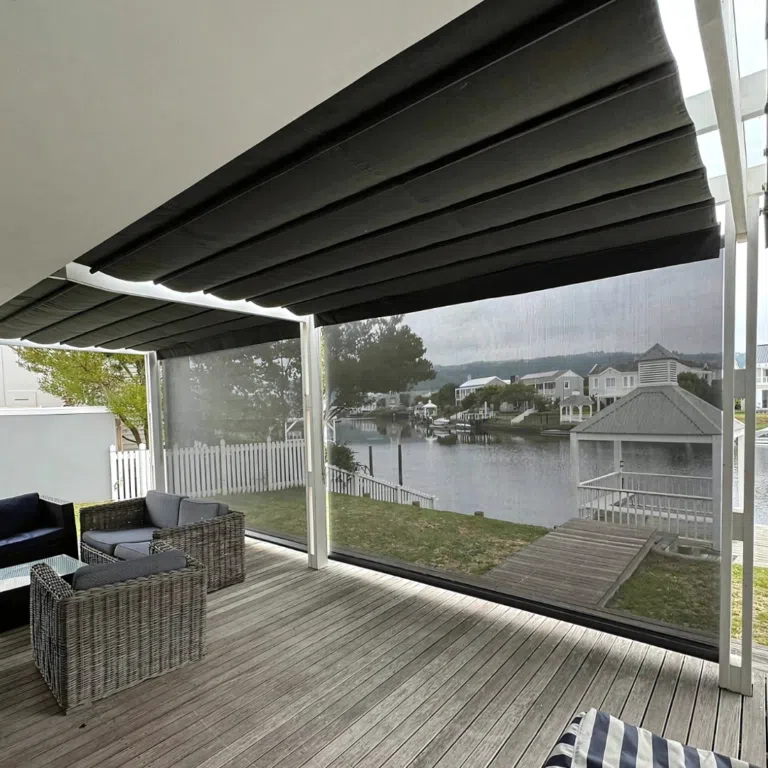
Louvre Awnings
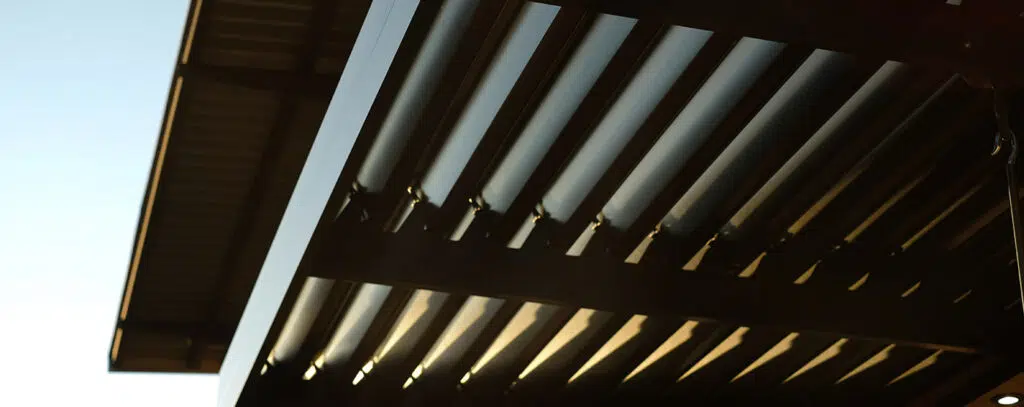
Louvre awnings use adjustable aluminium blades that tilt from fully open to fully closed. Open, they let light and air through. Closed, they form a waterproof roof that channels rain to integrated guttering. Motorised versions adjust to any angle between, giving you precise control over shade and ventilation throughout the day. Louvre awnings are manufactured by internationally accredited firms with local production facilities, using extruded aluminium that withstands coastal conditions. Custom Blinds supplies and installs these systems across the George, Knysna and Plettenberg Bay area.
Premium louvre systems integrate rain sensors that close automatically when moisture is detected, integrated LED lighting for evening use, and side screens that attach to the frame for additional wind protection. These are the most expensive awning option but deliver a true all-weather outdoor room. See a real installation on our awning case studies page.
Wedge and Fixed Awnings
For windows, shopfronts and narrow overhangs, wedge awnings provide permanent shade at a fixed angle. They reduce heat gain through glass, protect frames from weathering, and add a clean visual line to the building facade. Popular for bedrooms and living rooms facing north or west, where afternoon sun turns interiors into ovens during summer. A well-placed wedge awning can drop indoor temperatures noticeably without running air conditioning.
Wedge awnings are available in canvas fabrics. Aluminium frames with marine-grade fixings are standard for coastal installations. They require no mechanical operation, fixed in place, they work day and night without maintenance beyond occasional cleaning.
“If you can hear rain on your patio, the blind is doing its job. If you can feel rain, it is not. Get the blinds on the sides and the awning overhead, that is the formula.”
Duncan, Custom Blinds — outdoor living specialist, Garden Route
How do outdoor shutters combine security and weather protection?
Aluminium security shutters serve a different purpose to blinds and awnings. They mount over windows and doors, rolling down from a headbox to provide physical security, storm protection and privacy. Where blinds handle weather on patios, shutters handle weather and security on the building itself.
For holiday homes on the Garden Route, shutters solve two problems at once. They protect windows from storm damage when the house is unoccupied and provide a visible deterrent against break-ins. Many holiday home owners along the Knysna lagoon and in Plettenberg Bay install aluminium shutters specifically because the property sits empty for weeks or months at a time.
Aluminium shutters are powder-coated to resist salt air corrosion. They operate manually with a crank, or motorised with Somfy automation for remote access, useful when you want to open up the house before you arrive for the weekend.
Which outdoor products last on the South African coast?
The Garden Route puts outdoor products under constant pressure. Salt air corrodes steel fittings. UV degrades fabric and plastics. Humidity promotes mould on organic materials. Wind loading tests every bracket and fixing point. Products that work perfectly in Johannesburg or Pretoria can fail within two years on the coast.
Here is what holds up and what does not, based on 15 years of installing and maintaining products between George and Plettenberg Bay.
Materials That Last
- Marine-grade PVC (jointless), resists salt, UV and moisture. Rated for outdoor use and does not crack in cold weather.
- Powder-coated aluminium frames, the coating acts as a barrier against salt corrosion. Check that fixings are stainless steel, not zinc-plated.
- Solution-dyed canvas, colour runs through the fibre, not just on the surface. Fading is minimal even after years of UV exposure.
- Stainless steel 316 fittings, standard stainless (304) pits in salt air. 316 grade is the coastal minimum for brackets, screws and tensioners.
- Sheerweave mesh fabrics, engineered for outdoor use, UV-stabilised, and resistant to mould growth.
Materials to Avoid on the Coast
- Mild steel brackets, rust within months near the sea, even if painted.
- Untreated timber frames, swell, warp and rot. PVC or aluminium is always the better choice.
- Cheap imported PVC, seam welds fail, material becomes brittle in UV, and replacement costs more than fitting quality material from the start.
- Zinc-plated fasteners, the zinc coating corrodes rapidly in salt air, leaving bare steel that rusts through.
Read our detailed analysis in What Blinds, Shutters or Awnings Will Last at the Coast for specific product recommendations by location.

What mistakes do people make with outdoor blinds?
After 8,000+ installations across the Garden Route, these are the errors we see most often. Avoiding them saves money and frustration.
Choosing the Wrong Material for the Exposure
Clear PVC on a north-facing patio without overhead shade turns the space into a greenhouse. Mesh on a fully exposed coastal site lets rain through. The material has to match the specific conditions of your space, aspect, wind exposure, proximity to the sea and whether you have overhead cover already.
Underestimating Wind Loading
Budget blinds with lightweight brackets fail in coastal wind. The brackets are the first point of failure, followed by the fabric pulling free from the roller. Every outdoor blind system needs to be rated for the wind conditions at the installation point. A sheltered courtyard in Sedgefield has different requirements to an exposed deck on the Knysna Heads.
Not Planning for Drainage
When you enclose three sides of a patio with blinds, rainwater that used to blow through now pools at the base. If the patio floor has no fall or drainage channel, you end up with standing water. This needs to be addressed before installation, not after.
Fitting Blinds Only, Without Overhead Cover
Side blinds without overhead protection leave you exposed to direct rain from above. The combination of blinds on the sides and an awning overhead is what creates a genuine all-weather space. Blinds alone solve wind and sideways rain, but not downpours.
Buying Online Without Measuring Correctly
Outdoor openings are rarely perfectly square. A patio post that leans 10mm off plumb changes the measurement at every height. For online orders through the online shop, follow our measuring guide for outdoor blinds carefully. For local Garden Route orders, Duncan measures on-site, it removes the guesswork entirely.
How do you combine products for full outdoor protection?
The most effective outdoor living spaces use more than one product. A single product handles one problem, blinds block wind from the sides, awnings provide shade overhead, shutters secure the openings. Combining them creates a space that handles everything the South African climate delivers.
The Classic Combination: Outdoor Blinds + Louvre Awning
This is the most common setup we install on the Garden Route. Clear PVC blinds on two or three sides handle wind and rain. A louvre awning overhead handles sun and downpours. Open the louvres for sun on mild days, close them for rain. Roll the blinds up entirely when conditions are calm. The result is a patio that works in every season without permanent walls or roofing.
Blinds + Retractable Awning
For spaces where a permanent overhead structure is not wanted, pair side blinds with a retractable patio awning. The awning extends for shade when needed and retracts completely for stargazing, braais where smoke needs to rise, or when you simply want open sky. This setup costs less than a louvre system and suits patios where the primary concern is sun rather than rain.
Shutters + Blinds for Holiday Homes
Holiday properties on the Garden Route face a specific challenge: they need weather protection when occupied and security when empty. Aluminium security shutters on windows and doors handle the security side. Outdoor blinds on the patio protect the living space when you are there. Both can be motorised with Somfy automation for remote access, open the shutters and drop the blinds from your phone before you arrive.
Not sure which combination works for your space? Send a photo on WhatsApp to 079 523 5407, Duncan will tell you what works and what does not.
How do you choose the right outdoor product for your space?
Start with the problem, not the product. What annoys you most about your outdoor space right now? The answer points directly to the solution.
If Wind is the Main Problem
PVC outdoor blinds or zip-track systems. Clear PVC if you want to keep the view. Tinted or canvas if privacy matters more. Channel-guided blinds outperform standard roller blinds in consistently windy locations. On the Garden Route, the Plett and Knysna coastline typically needs zip-track or channel-guided systems because of the prevailing south-easterly.
If Sun and Heat are the Main Problem
A retractable awning or louvre awning overhead. For patios with existing roofing where heat radiates through, mesh blinds on the sun-facing sides reduce solar gain without losing the view. Folding-arm awnings suit larger open areas. Wedge awnings suit specific windows that catch afternoon sun.
If Rain is the Main Problem
The combination of PVC blinds on the sides and a waterproof awning (louvre or fixed) overhead. Canvas blinds shed water when properly tensioned but will not provide a watertight seal in a sustained downpour the way PVC does. For spaces where you want full weather protection, PVC plus a louvre overhead is the proven setup.
If Security is the Main Problem
Aluminium roller shutters for windows and doors. They physically prevent forced entry when closed and protect glass from storm damage. Combined with motorised automation, they can be scheduled to close at sunset and open at sunrise, or operated remotely from anywhere with a phone signal.
Which outdoor blinds work best for Airbnb, guest houses and rentals?
Rental and hospitality properties on the Garden Route have different requirements to owner-occupied homes. Products need to withstand heavy use by guests who are not always careful with them. They need to look good in listing photographs. And they need to require minimal maintenance between changeovers.
What Works for Rentals
PVC outdoor blinds in crank-operated or motorised configurations. Crank operation is simple enough for any guest to use without instructions. Motorised blinds with wall switches eliminate the learning curve entirely, press a button, blind goes down. Avoid cord-operated systems in rental properties; they tangle, fray and confuse guests.
For multi-unit holiday home developments, Custom Blinds can specify consistent products across all units with uniform colour and finish. Bulk orders reduce per-unit cost, and having one supplier who knows every unit makes maintenance straightforward.
The ROI Argument
A covered, weather-protected patio photographs better, earns better reviews, and commands higher nightly rates than an open, exposed one. Every listing that says “covered outdoor braai area” or “enclosed patio for all-weather entertaining” performs better in search on rental platforms. The installation pays for itself in higher occupancy and pricing.
Can outdoor blinds and awnings be motorised with smart controls?
Manual crank operation works perfectly well for most installations. But motorised systems offer convenience, automation and integration with smart home setups that manual simply cannot match.
Somfy motorisation is the standard we install. Motors mount inside the roller tube, connected to a wall switch, remote control, or Somfy TaHoma smart hub for phone and voice control. Wind sensors automatically retract awnings when gusts exceed safe thresholds. Rain sensors close louvre awnings when moisture is detected. Timer schedules lower blinds at dusk and raise them at dawn without any input.
For homes already running smart systems, Somfy integrates with Apple HomeKit, Google Home and Amazon Alexa. Group multiple blinds and awnings into scenes, “Evening Mode” drops all patio blinds and closes the louvres. “Morning” opens everything. Read our automatic outdoor blinds guide for the full picture.
The Value
What do you get when you choose Custom Blinds?
In-House Manufacturing
Canvas awnings and outdoor blinds built at our Garden Route facility. Faster lead times, local adjustments, no importing delays.
Somfy Automation
Official Somfy partner. Wind sensors, rain sensors, remote control and smart home integration fitted by our own team.
Coastal Engineered
Every product specified for salt air, UV and wind loading. Marine-grade fixings and powder-coated aluminium as standard.
One Contact
Duncan handles your project from measurement to installation. No handoffs, no subcontractors, no miscommunication.
Which outdoor products are available in your Garden Route town?
Every town on the Garden Route has different wind, sun and salt conditions. We specify outdoor blinds, awnings and shutters for each location individually. Tap your town for local product details and installation information.
Awnings Knysna · Awnings George · Awnings Plettenberg Bay · Awnings Mossel Bay · Awnings Sedgefield · Awnings Wilderness
Outdoor Blinds Garden Route · Retractable Folding Arm Awnings · Fall Arm Awnings · Canvas Awnings
Frequently Asked Questions
What is the best outdoor blind material for the Garden Route coast?
Jointless PVC is the most popular choice for coastal Garden Route installations. It provides complete wind and rain protection, resists salt air corrosion, and maintains visibility. For braai areas where airflow matters, Sheerweave mesh is the preferred alternative. Custom Blinds has installed over 8,000 products across the Garden Route since 2010.
How much do outdoor blinds cost in South Africa?
Outdoor blind pricing depends on the material, size and operating mechanism. PVC blinds for a standard patio opening start from mid-range pricing. Zip-track and motorised systems sit at the premium end. For an accurate quote, send your measurements and a photo of the space to Custom Blinds on WhatsApp or request a free on-site consultation on the Garden Route.
Should I get outdoor blinds or awnings for my patio?
It depends on the problem you are solving. Outdoor blinds protect from wind and sideways rain on the sides of your patio. Awnings protect from sun and direct rain overhead. Most effective setups use both, blinds on two or three sides with an awning above. Read our outdoor blinds vs awnings comparison for detailed guidance.
Can outdoor blinds be motorised?
Yes. Somfy motors fit inside the roller tube and connect to wall switches, remote controls or a smart hub for phone and voice control. Motorised outdoor blinds are particularly useful for large, heavy blinds that are difficult to crank manually, and for smart home integration with automated schedules and sensor triggers.
What outdoor blinds work best for restaurants on the Garden Route?
Clear PVC outdoor blinds on the sides combined with a louvre or retractable awning overhead. This allows restaurant owners to keep outdoor seating operational year-round. Motorised systems let staff adjust coverage from a wall switch without leaving the floor. Custom Blinds has fitted outdoor blinds at restaurants and cafes across Knysna, George and Plettenberg Bay.
How long do outdoor blinds last in South Africa?
Quality PVC outdoor blinds last 8 to 12 years in coastal conditions with proper maintenance. Canvas blinds last 7 to 10 years with periodic cleaning and re-tensioning. Aluminium frames and mechanisms last significantly longer, often 15 years or more. The key factor is material quality at installation. Budget products fail earlier, particularly in salt air environments.
Do you install outdoor blinds in Knysna, George and Plettenberg Bay?
Yes. Custom Blinds is based in Knysna and installs across the entire Garden Route including George, Plettenberg Bay, Sedgefield, Wilderness, Mossel Bay and surrounding areas. For properties outside the Garden Route, outdoor blinds are available for delivery nationally through the online shop.
Ready to Make Your Outdoor Space Work All Year?
Send a photo of your patio on WhatsApp or book a free on-site consultation on the Garden Route.
Published by Custom Blinds Shutters & Awnings, Knysna. Content reflects 20 years of Garden Route experience. Product specifications may vary by model and supplier. All installations subject to site-specific assessment. Last updated February 2026.